Step-by-Step Guide to Installing the Wasserstein Solar Panel with Nest Cam


Posted:
September 24, 2025
Categories:
Camera
If you own a Google Nest Cam (Battery), you already know how convenient it is for keeping your home safe. But constantly recharging the camera can feel like a chore. That’s why many homeowners choose the Wasserstein Solar Panel for Nest Cam — it keeps your device powered with clean, renewable energy.
The good news? Installing the panel isn’t complicated at all. In fact, you can set it up in under an hour with just a few tools. This guide will walk you through the step-by-step installation process, so your Nest Cam can stay charged and you can stop worrying about climbing ladders every few weeks.
What You’ll Need
Before we jump in, here’s what you should have handy:
- Wasserstein Solar Panel (compatible with Google Nest Cam Battery)
- Google Nest Cam (Battery)
- Mounting bracket and screws (usually included with the panel)
- A drill or screwdriver
- A ladder (if mounting high up)
Step 1: Choose the Right Location
The most important factor in getting the best performance is sunlight exposure. Place the solar panel where it will get at least 4–6 hours of direct sunlight daily.
- For homes in sunny climates like the UAE, this is usually easy.
- Avoid shaded areas caused by trees, roofs, or walls.
Pro Tip: “Think of your solar panel like a sunbathing friend — the more sunshine it gets, the happier it will be.”
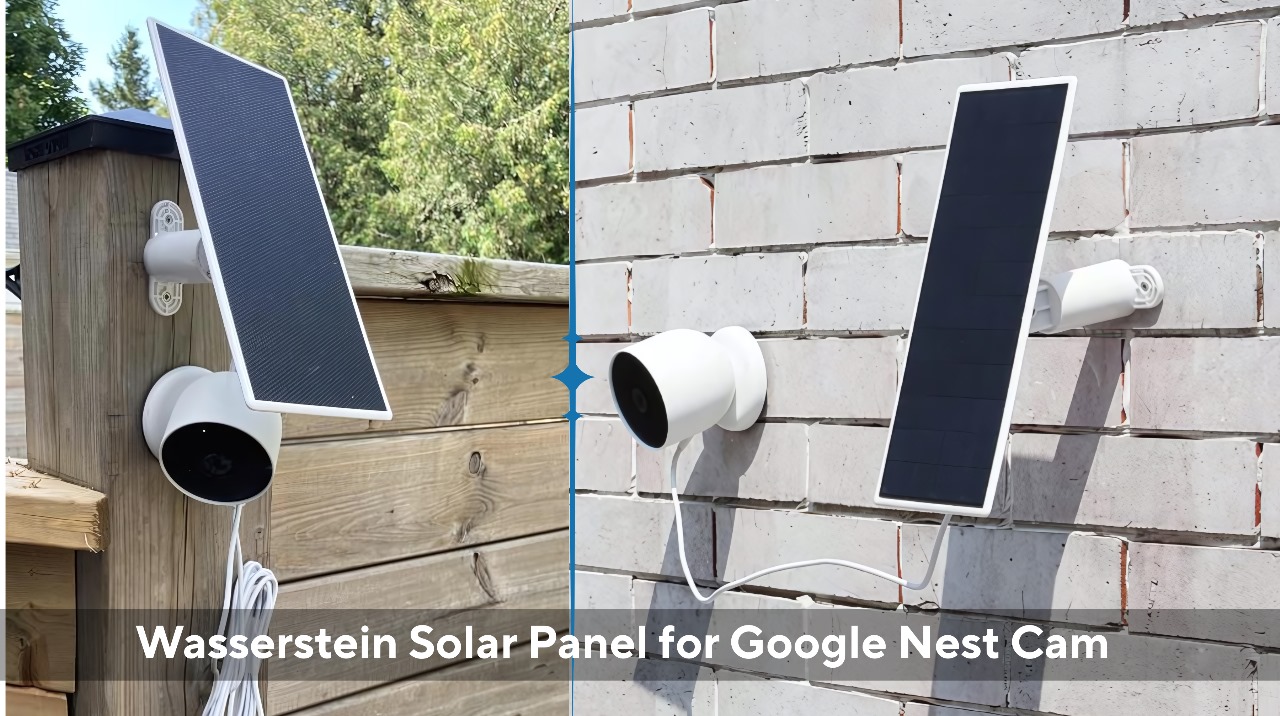
Step 2: Mount the Solar Panel
- Use the included mounting bracket to mark drill holes on your wall, fence, or siding.
- Drill the holes and secure the bracket with screws.
- Attach the solar panel to the bracket, making sure it’s firmly fixed and angled toward the sun.
Some panels come with an adjustable mount so you can tilt the angle slightly. In the northern hemisphere, tilting it southwards usually gives the best sunlight coverage.
Step 3: Connect the Cable
Once your panel is mounted:
- Take the included weatherproof cable.
- Plug one end into the solar panel.
- Connect the other end directly into the Nest Cam’s charging port.
The cable is designed to withstand outdoor conditions, so you don’t need to worry about rain or dust damaging it.
Step 4: Position Your Nest Cam
Next, place your Nest Cam in its ideal location — usually near entryways, gardens, or driveways. Make sure the solar panel cable reaches comfortably without stretching.
Once everything is in place, your camera should begin receiving power from the panel. You can confirm this in the Google Home app, which shows whether the device is charging.
Step 5: Test and Adjust
Let your setup run for a few hours and then check:
- Is the battery level staying steady or increasing?
- Does the panel get enough sunlight during peak hours?
If not, you may need to adjust the panel’s angle or location slightly.
Why Choose a Wasserstein Solar Panel?
- Continuous Power: No need to bring down your Nest Cam for charging.
- Weather-Resistant: Built to handle heat, rain, and dust.
- Eco-Friendly: Uses solar energy instead of traditional electricity.
- Cost-Saving: No more buying backup batteries or wasting electricity.
One Nest Cam user put it simply: “Since adding the Wasserstein Solar Panel, I haven’t touched my camera in months. It just works.”
Final Thoughts
Installing a Wasserstein Solar Panel with your Google Nest Cam is one of the easiest upgrades you can make for a smarter, more reliable home security system. With the right placement and setup, you’ll enjoy 24/7 protection without the hassle of constant recharging.
Ready to upgrade your Nest Cam setup? You can find the Wasserstein Solar Panel for Google Nest Cam at The Wireless Circle — your trusted store for smart home accessories in the UAE.
Comment(s)