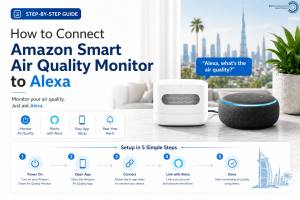
How to Connect Amazon Smart Air Quality Monitor to Alexa Step-by-Step (Including Wi-Fi Setup for Beginners)


Posted:
May 04, 2026
Categories:
Electronics shop

If you’ve just bought the Amazon Smart Air Quality Monitor, you’re probably excited to see how it works with Alexa. The good news? Setting it up is actually much easier than it looks—even if you’re not very technical.
In this guide, I’ll walk you through everything step-by-step, including Wi-Fi setup, Alexa connection, and first-time configuration so you can start monitoring your indoor air in minutes.
As one smart home user said, “Once I connected it to Alexa, I started getting air quality updates without even opening my phone.”
Let’s get you there too.
Step 1: Unbox and Check Your Device
Before anything else, unbox your Amazon Smart Air Quality Monitor and make sure you have:
- The device itself
- Power cable (if included or required)
- A stable Wi-Fi connection (2.4 GHz recommended)
- The Alexa app installed on your phone
Pro Tip: Make sure your Wi-Fi is working properly before starting setup. Many connection issues happen here.
Step 2: Download and Open the Alexa App
If you haven’t already, download the Amazon Alexa app from the App Store or Google Play.
Once installed:
- Sign in with your Amazon account
- Go to the “Devices” tab at the bottom
- Tap the “+” icon to add a new device
This is where your Alexa smart home setup begins.
Step 3: Power On Your Air Quality Monitor
Plug in your device and wait for it to turn on. It should automatically enter pairing mode when it’s ready to connect.
If it doesn’t:
- Press and hold the setup button (if available)
- Wait for the indicator light to blink
This means it’s ready for Wi-Fi pairing and Alexa connection.
Step 4: Connect to Wi-Fi
Now comes the most important part is Wi-Fi setup.
In the Alexa app:
- Tap Add Device
- Select Air Quality Monitor
- Choose your Wi-Fi network (2.4 GHz only)
- Enter your Wi-Fi password
Wait a few seconds while Alexa connects your device.
If it fails, double-check:
- Password is correct
- Router is not blocking new devices
- You’re not using 5GHz Wi-Fi
Step 5: Link to Alexa for Voice Control
Once connected to Wi-Fi, Alexa will automatically detect the device.
Now you can:
- Rename the device (e.g., “Living Room Air Monitor”)
- Assign it to a room
- Enable voice updates
Try saying:
“Alexa, what’s the air quality in the living room?”
Step 6: Set Up Notifications (Optional but Recommended)
Inside the Alexa app:
- Go to device settings
- Turn on air quality alerts
- Set thresholds for PM2.5 or VOC changes
This is useful if you want real-time updates when air quality changes.
Why This Setup Matters
A properly connected air quality monitor helps you:
- Track indoor pollution
- Improve sleep quality
- Manage allergens and dust
- Create a healthier smart home
At The Wireless Circle, we always recommend pairing smart devices like this with Alexa routines for maximum automation.
Visit us: https://thewirelesscircle.ae/
Final Thoughts
Setting up the Amazon Smart Air Quality Monitor with Alexa is honestly a 10–15 minute job if you follow the steps carefully. Once it’s connected, you’ll start getting real-time insights about your home’s air quality without doing anything manually.
If you’re building a smart home, this is one of the easiest and most useful devices to start with.
Comment(s)